Learn interfacing RGB 3 Color LED Module KY-016 in Raspberry Pi. RGB LED module is capable of producing lights of different colors using a single LED. We can generate light of any color code through this module. In this, we will generate lights of all colors. We are using Raspberry Pi 3 and RGB 3 Color LED Module KY-016 for this. So, let’s start.
First, let’s start with the basics of the RGB LED module.
Operating Voltage: 5V
LED drive mode: Common cathode driver
LED diameter: 5mm
Step 1: Required Components
RGB LED Module x 1
Breadboard x 1
Raspberry Pi x 1
Jumper Wires x 1
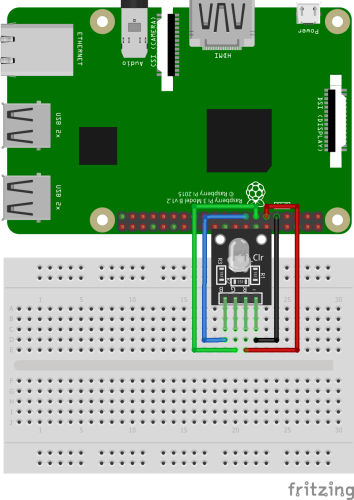
Step 2: Circuit Time
Make the circuit as per the given diagram. Connect Red LED pin to GPIO 17, Green pin to GPIO 27 and Blue LED pin to GPIO 22. Now, Connect the GND pin of the KY-016 module to the GND pin of Raspberry Pi. The RGB LED module will not require any limiting resistors.

Step 3: Code Time
This is code for RGB 3 Color LED Module KY-016 in Raspberry Pi. Firstly, we declare pins for red, green and blue pins. Then, set the declared pins in output mode. We are using the PWM method so we declare frequency also. Here, 100 means the highest frequency. In a while loop, we have given RED pin the highest frequency to start with. We have used for loop to provide a frequency to operate other colors. The exception will turn off GPIO pins when the code is interrupted.
Step 4: Run code to Raspberry Pi
Set the components as per the Circuit Diagram and run the above-given code in Raspberry Pi. Lights of different colors will be produced simultaneously starting with Red color.
For running python code in Raspberry Pi, visit: raspberrypi.org/documentation/usage/python/
Learn basic hardware information of Raspberry Pi 3.
